

CartoType and Mapbox
CartoType can now use online Mapbox data. This article describes the technical challenges of interfacing the two systems.

CartoType can now use Mapbox vector tiles. You can create a detailed map of the world with routing and geocoding by supplying the Mapbox vector tile URL instead of the name of a map file, and providing a Mapbox access token.
The task of implementing this new capability involved what could be loosely termed an impedance mismatch, because CartoType and Mapbox use different design approaches.
CartoType:
designed for offline data
single map files (CTM1 files) contain all the data for a map
uses the CTM1 data format
map files can contain data in any projection
map files contain route calculation network and address search tables
standard layers are designed to be rendered by CartoType's standard style sheet
internal coordinates are 32nds of projected map metres
map data contains no rendering information
Mapbox:
designed for online data provided by a remote server
map data is split up among millions of tiles
uses the MVT (Mapbox Vector Tile) data format, which uses the Protobuf system
map data is in the Web Mercator projection
route calculation and address searching are separate services
standard layers are designed to be rendered by one of Mapbox's standard style sheets
internal coordinates are 4096ths of the width or height (they are the same) of a map tile
map data contains suggested positions for labels, colours of highway shields, etc.
Reading Protobuf data
The first task was to read and decode the data in MVT tiles, which use the Protocol Buffer (Protobuf) system. Initially I tried to add the official Protobuf library to CartoType, but that proved impractical. The official Protobuf system works like this:
Obtain or write a .proto file (there is an example in the Wikipedia article) describing the data format.
Compile the .proto file into your favourite language using the Protobuf compiler.
Add the generated code to your project.
At run time, use the Protobuf runtime library to read the data files.
Step one is easy: Mapbox provides the MVT .proto file.
Step two is also easy. I was able to use protoc.exe, the Protobuf compiler, to create C++ code.
The difficulty arises with steps three and four. The generated code is not self-sufficient, but requires the Protobuf runtime library, and that is enormous and pulls in another enormous library called Abseil that duplicates parts of the standard C++ library and adds some extensions. All this is needed only if you are making advanced and complex use of Protobuf. Only one novel function is needed to read Protobuf data: read a variable-length integer. Other functionality can easily be built on top of it. (The other basic functions that are needed are those to read little-endian 4-byte and 8-byte floating-point numbers and reinterpret them as 'float' and 'double' respectively; they are trivial.)
Protobuf-encoded data consists of a series of records which may contain other records recursively. Each record starts with a tag defining its type and (implicitly or explicitly) its length. A record is either a key-value pair, a key and an array of values, or a record that contains other records, corresponding to a structure or class in programming languages. There is a good on-line explanation of the Protobuf format.
A home-made MVT library
I decided, after some frustrating attempts to integrate the Protobuf C++ library into CartoType to write my own library for reading MVT data.
Variable-length integers in Protobuf
Most integers in any data are small. In fact a large proportion are boolean values that can be stored in one bit. It would be inefficient to store each integer in 32 bits, and that would not be sufficient for numbers larger than that, which are sometimes found. The fix is to use a variable-length encoding. There are many such encodings; Protobuf uses a simple one in which each 8-bit byte holds 7 bits of data in its low bits, while the high bit, if set, signals that this byte is not the last. A single byte can store the numbers 0...127, two bytes the numbers 0...16383, three bytes 0...2,097,151, four bytes 0...268,435,455, and so on. Ten bytes are sufficient for 64-bit integers. This format is redundant because each sequence longer than a single byte can represent all the values stored by shorter sequences, but that doesn't matter and is counterbalanced by simplicity of reading and writing.
The CartoType Protobuf library
Using some existing CartoType stream functions including the all-important one for reading variable-length integers I was able to implement a Protobuf reader in 82 lines of C++ code, including blank lines, and using the clear
namespace ProtoBuf
{

enum class WireType
    {
    VARINT,
    I64,
    LEN,
    SGROUP,
    EGROUP,
    I32
    };

class Tag
    {
    public:
    uint32_t FieldNumber = 0;
    WireType Type = WireType::VARINT;

    /** The length of the payload in bytes, or 0 if the type is VARINT. */
    int64_t Length = 0;
    };

static Tag ReadTag(InputStream& aInput)
    {
    uint32_t n = aInput.ReadUintMax32();
    auto tag = Tag { n >> 3, WireType(n & 7) };
    switch (tag.Type)
        {
        case WireType::VARINT:
            break;
        case WireType::I64:
            tag.Length = 8;
            break;
        case WireType::LEN:
            tag.Length = aInput.ReadUint();
            break;
        case WireType::SGROUP:
        case WireType::EGROUP:
            break;
        case WireType::I32:
            tag.Length = 4;
            break;
        }
    return tag;
    }

static std::string ReadPayloadAsString(InputStream& aInput,const Tag& aTag)
    {
    if (aTag.Type != ProtoBuf::WireType::LEN)
        throw KErrorCorrupt;
    if (aTag.Length > SIZE_MAX)
        throw KErrorOverflow;
    std::string s(aTag.Length,0);
    size_t actual_bytes = 0;
    aInput.ReadBytes((uint8_t*)s.data(),aTag.Length,actual_bytes);
    s.resize(actual_bytes);
    return s;
    }

static void ReadPayloadToIntArray(InputStream& aInput,const Tag& aTag,std::vector<uint32_t>& aDestArray)
    {
    if (aTag.Type == WireType::VARINT)
        aDestArray.emplace_back(aInput.ReadUintMax32());
    else
        {
        if (aTag.Type != WireType::LEN)
            throw KErrorCorrupt;
        int64_t end = aInput.Position() + aTag.Length;
        while (aInput.Position() < end)
            aDestArray.emplace_back(aInput.ReadUintMax32());
        }
    }

static void SkipPayload(InputStream& aInput,const Tag& aTag)
    {
    if (aTag.Type == WireType::VARINT)
        aInput.ReadUint();
    else
        aInput.Skip(aTag.Length);
    }

}
It is not complete, but it does everything needed in reading Mapbox tiles. It is now intensively field-tested and works correctly for that purpose.
The Mapbox Protobuf format
The MVT tile format is very simple. A tile is made from one or more layers. A layer has a name, a set of keys, which are strings, and a set of values, which may be strings or numbers; and contains one or more features, which are what CartoType calls map objects. A feature has an array of pairs of numbers made of a key index and a value index; each pair is thus a key-value pair referring to the feature. It also has a geometry type indicating whether it is a point, polyline or poly-polygon. The geometry is stored as a series of opcodes for moves, lines and ends of paths. Coordinates are always deltas relative to the current position, and are in units of 4096ths of the width of the current tile. The MVT format says nothing about the tile width in projected metres; that is inferred from the zoom level supplied when the tile is retrieved.
I was able to implement the reading of an MVT tile from Protobuf format in about two hundred lines of C++ code.
It is useful to note that MVT tiles as served by Mapbox are gzip-encoded, which reduces them to about three fifths of their raw size. They can be decoded using the Zlib library.
Converting Mapbox geometry to CartoType format
I'll recap the differences between the Mapbox and CartoType geometry formats.
Note first that by 'geometry' I mean the actual point, lines or polygons representing the shape and position of a map object. A mountain peak is a point; a road is a series of points made into a line; a lake is a polygon for the outline, and possibly more polygons for islands inside the lake. Map data formats do not generally encode curves: the plan view of a circular oil tank, for example, is represented as many-sided polygon. CartoType uses curved map objects for overlaid data, but that is unusual.
Mapbox uses coordinates on a square with origin at (0,0) and width and height of 4096. Map objects may extend outside that square and should be clipped if necessary. X coordinates increase from left to right, but Y coordinates follow the display convention of increasing downwards rather than the more usual geographic and geometric convention of increasing upwards. The 4096-by-4096 square represents a single map tile, using the same Web Mercator tiling system as OpenStreetMap and Google Maps.
CartoType uses projected map metres, multiplied by 32: that is, 32nds of metres. Originally CartoType used full metres, but that proved insufficient for the details of building outlines when zoomed in. Shifting metres left by five bits gives units that can handle building outlines, are easy to work with, and fit into 32 bits without causing integer overflow on maps of the world.
It is quite easy to create a 2D affine transformation to convert from Mapbox to CartoType coordinates. The steps to create the transform are:
Start with the identity transform.
Reflect it around (Y = 2048) to produce Y-downward coordinates.
Given the zoom level and the X and Y coordinates of the Mapbox tile, obtain the bounds of the tile in CartoType map units. This is simple: calculate 2^(zoom level) as the tile span: the number of tiles across the projected world square; divide the width of the world square (~40,075,017 metres) by the tile span to give the tile width (which is the same as the height); offset by X and Y times the tile width. Multiply the results by 32 to get CartoType map units (32nds of projected metres).
Scale the transform by the width of the tile in CartoType map units divided by 4096.
Translate the transform by the origin of the tile in CartoType units.
Now all that is needed is to apply the transform to each pair of coordinates as it is read from the Mapbox feature.
Converting Mapbox features to CartoType map objects
The data set I have so far worked with is Mapbox Streets v8, which provides land outlines, roads, railways, rivers, lakes and seas, and points of interest, making it suitable for use in a normal CartoType map.
Both Mapbox and CartoType organise map data into a set of layers. The Mapbox Streets data set has, among others, these layers:
building
landuse
place_label
road
water
waterway
while CartoType has, among others:
building
land
place
road
waterway
which is a very similar partial list. There are some very important differences:
Generalisation
Mapbox generalises and simplifies data in an appropriate way for each zoom level, assuming a certain map scale for each zoom level (OpenStreetMap zoom levels, minus one); 1:250,000,000 is the scale for zoom level 0; zoom levels can be computed as log2(250,000,000) minus log2(scale).
CartoType performs some simplification at data preparation time but does not create a separate data set for every zoom level. Further simplification occurs when the data is loaded.
Furthermore, CartoType splits some layers like road and water into sub-layers: road/major, road/mid, and road/minor, waterway/major and waterway/minor, allowing the run-time code to load less data.
Land and sea areas
Mapbox treats the map background as land, and draws the seas and oceans on top. Any water areas in a tile are represented as polygons in the water layer.
CartoType treats the map background as sea, and draws land as objects from the outline layer. Lakes, rivers, and other inland water bodies are drawn on top using the waterway layer.
Labelling
Mapbox supplies positions for labels as map layers. While road features contains their names, most other features, like the water layer, do not contain names. The names are supplied in separate layers like natural_label and airport_label. That is not a problem for point objects like city centre points and POIs (points of interest), where the label point is also the position of the map object, but it certainly does present a problem for CartoType in the display of labels for rivers, islands, parks, and so on.
CartoType, by design, provides no help for the renderer in positioning labels. Labelling, including the choice of whether or not to draw a label, where to draw it, which font and colour to use, whether to draw an icon, and other matters, is entirely determined by the style sheet.
Using CartoType import rules
The complicated rules for converting Mapbox features to CartoType map objects are most easily expressed using a CartoType import script written in a special-purpose XML mini-language. Every Mapbox feature is converted into a dictionary associating keys with values, and those become variables available to the import rules.
The import rules are compiled into a form suitable for fast threaded interpretation and run once for every Mapbox feature. Every time a <commit> rule is executed, a CartoType map object is created.
Here is a short extract from the import rules used for MVT data, showing how Mapbox admin and aeroway features are converted.
 <group test='@layer="admin"'>
            <set_layer test='admin_level=0' name='boundary/major'/>
            <set_layer else='1' name='boundary/minor'/>
            <set_subtype value='(admin_level+1) * 2'/>
            <set_feature_type test='admin_level=0' name='aab'/>
            <set_feature_type else='admin_level=1' name='aad'/>
            <set_feature_type else='admin_level=2' name='aaf'/>
            <commit/>
        </group>

        <group else='@layer="aeroway"'>
            <commit test='type="runway"' layer='amenity/major' feature_type='run'/>
            <commit else='type="taxiway"' layer='amenity/minor' feature_type='twy'/>
            <commit else='type="apron"' layer='amenity/minor' feature_type='apr'/>
            <commit else='type="helipad"' layer='amenity/minor' feature_type='hel'/>
        </group>
Rendering the map
CartoType obtains map data from a data source using a data accessor which returns map objects in response to a request. It then converts the map objects into cached rendering data for the OpenGL ES 2.0 drawing system.
To render MVT data I had to use the functionality described above inside a new data accessor class specialised for MVT data. This data accessor recognises Mapbox URLs, opens an internet connection using the Naext library to fetch the MVT tiles that covers the desired view, converts them to CartoType map objects, then passes them back to the rendering system. Here is a comparison of a map drawn using CartoType's CTM1 data derived from OpenStreetMap with one drawn using Mapbox Streets v8 data:
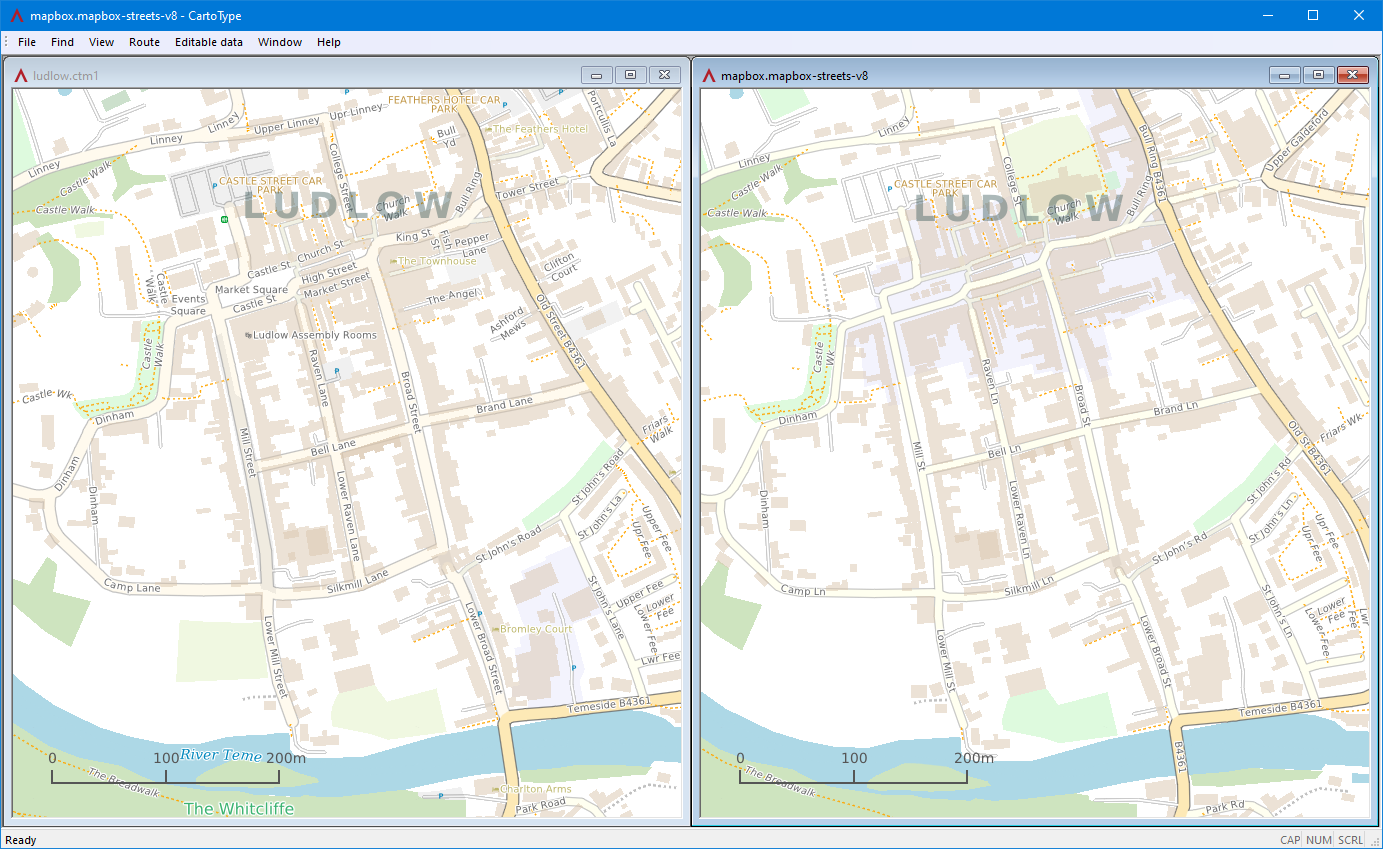
Notable differences
More street names and places of interest are shown on the CTM1 map.
CTM1 stores full street names and abbreviates them where necessary. Mapbox stores abbreviated data; 'Broad Street' always appears as 'Broad St' even where there is room for the full form.
Some feature names like 'River Teme' and 'The Whitcliffe' are not shown on the Mapbox-derived map because they are stored in separate layers like natural_label rather than associated with the feature itself. This can be solved by adding new layers to the standard style sheet, but I have not yet done it.
Using Mapbox routing
When CartoType uses Mapbox data to draw a map, it cannot calculate a route directly from that data. Unlike CartoType's native CTM1 format, which is a single file containing a route calculation network, Mapbox data consists of separate tiles containing only the information needed to draw the map. Therefore to offer a full service CartoType needs to use the separate Mapbox directions API.
CartoType's route calculation interface
CartoType has an abstract routing interface which allows maps to provide different types of route calculation data. The makemap data preparation program can add the following types of route calculation data, among others, to a CartoType map:
Simple A*: fast, relatively compact, but data needs to be loaded into memory, and this system cannot handle turn costs perfectly, so misses certain optimal routes.
Turn-expanded A*: slightly slower than simple A*, and less compact, but handles turn costs correctly and always produces the best route if given correct data. "Turn-expanded" means that the route graph represents road segments as nodes and turns as arcs.
Contraction hierarchy: much faster than A*, and requires very little RAM, but cannot support route profiles that are customisable at run-time.
The route calculation interface provides a unified way of calculating a route, whatever the underlying data and algorithm. When CartoType loads a map or maps, it asks the map database objects what type of routing they supply, and uses that information to decide which route calculation system to use. The route calculation interface has virtual functions to do the following:
Calculate a route, given start and end points.
Set the current route profile (driving, cycling or walking, or a custom profile).
Enumerate built-in route profiles and report other capabilities.
The start and end points of a CartoType route can be supplemented by other information to help decide on a route:
Vehicle heading: the router can try to find a route avoiding a U turn at the start of the journey, or arriving on the wrong side of the road at its end.
Heading direction accuracy.
Location accuracy.
Maximum distance to search for a nearby routable road.
To implement Mapbox routing in CartoType I had to create a new implementation of the route calculation interface.
How the Mapbox directions API works
The Mapbox directions API is full-featured and powerful but can be used in quite a simple way by supplying the profile name, start and end points in degrees longitude and latitude. It also allows the vehicle heading and maximum search distance to be supplied, which fits well with the CartoType system.
https://api.mapbox.com/directions/v5/mapbox/driving-traffic/
-0.14947,51.57365;-0.18864,51.55884
?overview=full
&annotations=distance,duration,maxspeed
&steps=true
&radiuses=100;100
&bearings=;135,22.5
&access_token=xxxxxx
The response is a JSON object, which CartoType parses using the excellent RapidJSON open source library.
Converting Mapbox directions into a CartoType Route object
In contrast to the task of dealing with Mapbox vector tiles, there is no great difficulty or impedance mismatch when converting Mapbox directions into a CartoType Route. Both types of route consist of a series of steps starting with a turn or other manoeuvre, and each step has a road name or reference, road type, maximum speed, and geometry. The geometry is encoded using the Google Maps encoded polyline format, which uses degrees of longitude and latitude representing base-64 signed integers with five decimal places of precision, giving resolution of about a metre at the equator, and somewhat better at high latitudes. (That is good enough for routing, although not for drawing maps; CartoType uses 1/32-metre resolution for that purpose so that building outlines are not overly distorted.)
When the CartoType Route object has been created it is passed back to the main part of the CartoType system and it can be drawn on the map and used for turn-by-turn navigation in the same way as a route from any other source.
Opening a map using Mapbox data
CartoType’s API for opening a map requires a filename (which in nearly all cases is that of a CTM1 file - CartoType’s native map format) and an optional key, which may be an API key or encryption key or any other string. To open a map that uses online Mapbox data, the filename is repurposed as a URL, and the key is a Mapbox access token. The URL for Mapbox vector tile data is https://api.mapbox.com/v4/mapbox.mapbox-streets-v8.